Saturday, August 30, 2014

C. F. Martin & Co. Guitars - Fine Wood Craftsmanship in America


I visited the C. F. Martin & Co. guitar manufacturing plant in Nazareth, PA and took the factory tour. I was very impressed and also very surprised.  For some dumb reason I had expected to see a tiny woodshop with talented luthiers using hand tools, producing a few guitars a day.  Martin Guitar certainly has talented luthiers using hand tools, many with over 30 years of experience; but this all takes place within a humongous factory that uses modern production machinery to produce several hundred guitars per day.  Sure, they use laser cutting of the wood and robots for the final sanding and polishing, but the important woodcraft, all fitting and forming, is still done proudly by hand.
I observed one craftsperson fitting the guitar neck into the body. To me, it looked like a nice tight fit, but it was obviously not up to Martin Guitar standards, or her own personal standards as a luthier.  She tapped the neck out and used a very sharp chisel to shave a tiny, paper-thin slice from each side surface. She then gave it another dry fitting before gluing. It was now perfect.  It makes me feel good to see that exacting wood craftsmanship can still exist in such a high production environment.


The guitar tops are almost always made of spruce.  The sides and back of the guitars is where the “wow” factor comes in.   Martin Guitar uses beautifully grained hardwoods like walnut, tiger maple, mahogany, sapale and rosewood.  Just gorgeous.


Many of Martin guitars are custom made and have special mother of pearl inlays.  Laser assisted, but the final inlay and fitting work is all done by hand.

 
If you are a serious guitar player, the Martin Guitar factory with its spectacular guitar museum is like Mecca to Moslems or Vatican City to Catholics.  I don’t have to tell you about it.  You’ve probably been there already.  If you are a wood crafter or love objects made from wood, I would recommend that you go out of your way to visit this place and take the tour.  It’s very impressive.
 

Tuesday, January 14, 2014

Bandsaw Box for Storing Flies

 
I love fly fishing.  I enjoy standing in the stream and feeling nature surround me.  I enjoy the challenge of trying to make a perfect cast where the fly line just rolls out to exactly where you want the fly to land.  I enjoy watching the pattern of the water flowing over the rocks.  Someone once told me that, at times, a trout will actually get snagged on the sharp little hook attached to the fly at the end of your line.  I think he was making it up.  I never catch any fish.  But I do enjoy the experience. 

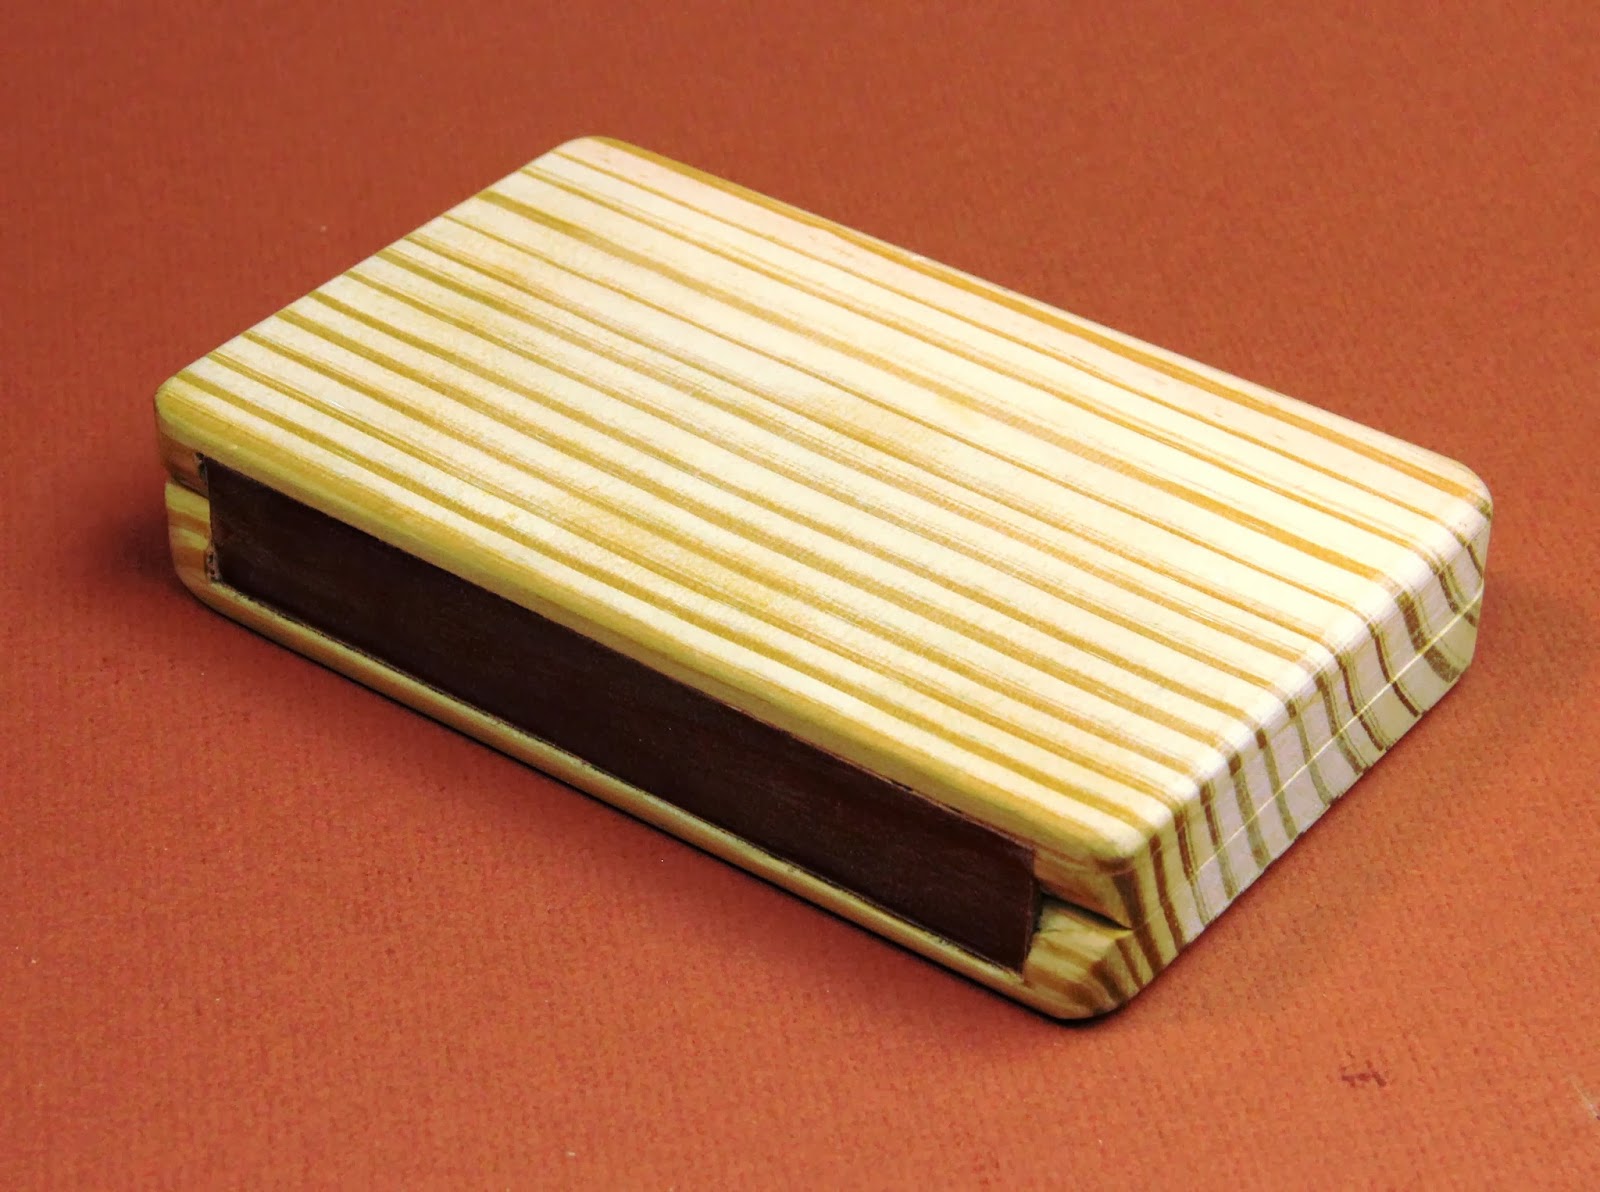
I got an idea to make a fly storage box using band saw box techniques.  I could use magnets for closure, but what could I use for a hinge?  All of the hand-made wooden fly boxes I found on the internet used brass hinges.  They required extra thickness of the wood and, from my experience, were difficult to set perfectly on small boxes.  I got the idea of using a thin leather strip as the hinge.  It was all trial and error from that point, so I made a prototype out of 2x6 pine.  I know nothing about leather, so I made a trip to my local Tandy Leather store, which proved to be very helpful.  I picked out about $2 worth of leather from the scrap bin, which will probably be enough for my next 20 projects ;-).  The clerk/leather expert also recommended a small bottle of neatsfoot oil, which is used to make leather very soft and flexible.  I was not aware of this magic oil, but apparently any serious baseball player with a mitt is very familiar with it.  I used epoxy to adhere the leather hinge strip to the wood.  After a few adjustments, I got the hinge to work just fine.  Here are some photos showing steps in the process.  If anyone else out there has had any experiences with leather box hinges, I would love to hear about them.

A router was used to cut out the groove for the leather
hinge strip, before the box was sawn into two halves.
The leather was 0.07 " thick.
 
The leather hinge strips were glued on using a strong epoxy. 
The photo shows the leather strip being clamped during glueing.
A scrap of wood was used to provide even pressure.

A prototype was made out of a common 2x6 to test glueing
method and clearances.  I found that a thin strip of masking
tape down the middle of the hinge kept it free from epoxy
so it remained more flexible..

Neatsfoot oil was liberally placed on the leather hinge strip
using a cotton swab.  This provided even more flexibility.

This photo shows the leather hinge flexing

The finished products.  I made one from walnut
and the other from spalted silver maple. 


Friday, November 1, 2013

Rick’s Knife Handle

 
My son-in-law Rick brought me a beautiful steel knife blade with tang, and a piece of buckeye burl wood, and he asked me if I would make him a knife handle.  I couldn’t say “no”.  He must have thought that just because I make things out of wood, I would automatically know how to make a knife handle.  Wrong.  I’ve never done this before.  If he had asked me to whittle a stick in the shape of a knife, I would have used trial and error until I got it right, but with one expensive blade and one fancy piece of wood, I knew I would only get one single shot at doing it right.  Thanks Rick.  I really needed the stress.

Well the bottom line is that, like so many things in life, I created stress where there was no reason for stress.  The task was actually not as difficult as I had first imagined.  As a first step, I searched the internet (and more specifically YouTube), for information on how to attach pieces of wood to the knife tang and make a handle out of it.  As you might imagine, it’s all there.  Also, as you might imagine, there are a number of different approaches or techniques.  Most of the techniques use epoxy to hold the wood handle parts to the metal tang, and that’s the direction I took.  Of course, you have to use metal pins to hold the whole thing together, but with the use of the epoxy, there is no need to peen the pins to secure the wooden halves as you might expect. I used some common sense and left some exposed wood in all directions for sanding.  Even though I normally hate sanding most wooden objects I make, I have to admit that sanding and shaping the knife handle was actually fun.  My stationary belt sander was quite useful in the shaping.
   

I wrapped the blade and the exposed metal in duct tape
to protect the finish, and my hands.
During the shaping on the belt sander,
I scraped the metal on the handle.
This came out with steel wool and buffing.
I used tung oil for the
finish, and fine sanded
between each coat to get a
very smooth result.


Of course I couldn’t just hand him the knife, so I fixed up one of my flat cigar boxes as sort of a “presentation box”.  I must admit, I was pretty proud of the final result.  Now that I am an “expert” at making knife handles, I’m starting to look into knife kits on the internet.  Have any of you had any experiences with making knife handles?  If so, I would love to hear about them.

The finished knife in a presentation box

Wednesday, October 16, 2013

Inspiration Stagnation Liberation

photo of my zinnias
top of carved cigar box


I’ve heard of writer’s block, but I wonder if there is such at thing as carver’s block.

I had this beautiful discarded cigar box made of thick cedar wood.  It was just aching to be carved, but the box sat for weeks because I had no inspiration what-so-ever about what to carve on it.  I could use one of those graphic Japanese crest symbols, or Celtic designs, but this box had a certain elegance that seemed to cry out “flowers”.  I went through images of flowers on the internet, but nothing popped out.  I then decided to go through my own file of flower photographs that I had taken myself.  Bingo!  I found a nice photo of zinnias taken in my front yard. 
 
With some tweaking, the design seemed to fit the box well.  It had nice detail, but not too difficult to carve. I printed the photo on plain paper and then simplified the flowers by selected the elements of the design that I thought would make a good carving on the lid of the box. 
As I mentioned in a previous post, these empty wooden cigar boxes are available from my local cigar store for just $1 each, so I carve the design in the lid first, before I attempt to work on the rest of the box.  If the carving doesn’t work out, I just discard the box without wasting time on the finish or interior of the box.  Well, this carving turned out pretty good, so I went on and finished the box.  I added the black walnut corner inserts.  This was the first time I did this on any box.  I used a special jig that I built based on plans in a box making book.  I cut the thin walnut corner inserts to an 1/8 inch thickness to match the kerf slot made by my table saw blade.
 
interior tray
I finished the box by using the interior cedar side spacers that came with the box to construct an interior tray.  Like anything else, the more of these interior trays I make, the better they turn out. I’m pretty pleased with the resulting box.
The finished keepsake box
Now, I have to get inspired for my next carved box.  Any suggestions?


Saturday, August 10, 2013

Carved Wooden Doors of Europe

door on street in Florence, Italy
detail of door on the left
 
There is something about carved wooden doors in Europe that captivates me.  Many are beautifully works of art.  Some are centuries old.  Some are in cathedrals, but others are on ordinary city streets. You don't see many doors like this in the United States. 
Here is a collection for your enjoyment.
 

door to choir loft - St. Peter's Church - Munich
door on street in Florence, Italy


Detail on main door of Basilica of Santa Maria degli Angeli near Assisi, Italy
 
side panel of door shown to the left
Basilica of Santa Maria degli Angeli
Cathedral of St. Lorenzo - Perusia, Italy

Monday, April 29, 2013

Woodcarving in Oberammergau - Both Sacred and Profane

Oberammergau is a small village in the Bavarian Alps which is known for its famous Passion Play performed every 10 years, and its woodcarving. It seems like half the shops in this tourist destination are wood carving shops. Some are small, with the local wood carver proprietor actually working on pieces in the shop. Most shops are large and overwhelming with thousands of carved figures appealing to every type of tourist. They range in size from huge carvings selling for hundreds of Euros down to tiny 5 cm animals and saints. Most of the huge carvings are hand-carved in Bavaria. Most of the smaller carvings are from China or Indonesia, although not marked as such. Some items are obviously machine-carved.

For the most part, the subjects are sacred religious carvings of saints and crucifixes mixed in with a few traditional Bavarian figures. The odd thing is that most window displays also include profane or suggestive carvings right next to a Madonna holding the Infant Jesus. One might see a nude woman right next to St. Francis. On some shop websites, anything that is not religious is actually classified as profanfiguren.

One reoccurring carving theme that certainly fits into the profane category is a carving of a chubby man in a squat position, grunting and…defecating. (See photo above) This little man appeared in several shops, right on the shelf with all the religious figures. I discussed it with a shop owner who was actually carving one of these figures at the time. He explained in broken English that it is a traditional Bavarian theme. At one time, long ago, it was actually used as a form of political protest. When Bavaria was occupied by a conquering army, the carvers gave the swatting man the face of the foreign leader. Today, it is the same traditional shape but it is done as just a humorous character.

As a contrast, take a look at the photo below of the grave marker. This is not a famous carving in a prominent place. It is just a simple grave, hidden in the church cemetery. It is not a recurring theme, but rather a unique work of art. No doubt the grave marker was done by a local carver, perhaps by a family member or friend. The symbols and saints probably had some special significance to the person buried there. It is certainly sacred. It will not be found in any shop window.


If you screen out the crass commercialism and tourist focus, without a doubt, the carvers of Oberammergau are highly skilled craftsmen and they produce beautiful work. Oberammergau is a repository of carving skills passed down from previous generations. If you are a woodcarver, you get the feeling you are in a very special place, a place sacred to woodcarvers.


Carving of a Kraxentrager. 
These traveling salesmen carried wood
carvings to villages throughout Bavaria.

Detail of Kraxentrager carving


Wednesday, August 8, 2012

Carving Japanese Crests on Old Cigar Boxes

In my search for interesting symbols to carve on recycled wooden cigar boxes, I discovered Japanese crests. These crests, also called mon, or in the case of family crests, kamon, have been an important element in Japanese design for centuries. Their history and usage throughout the ages is an interesting subject. I will not go into the history in this posting, but you can do your own research on the internet. The crest symbols were originally used by the samurai and powerful warlord families. Today they are used primarily as decorative symbols for fabrics, tattoos, and corporate logos. The three diamond Mitsubishi logo for example, seen on all their vehicles, is actually the family crest. It symbolically represents three water chestnuts.


I started by getting a good reference book which shows hundreds of Japanese crest patterns and variations. Certain designs are perfect for carving; others are not. Some crests, even though very beautiful, are just too detailed and intricate to carve in wood. Some crests are very dramatic and impressive; others are rather mundane.

Most representations of the mon symbols are seen as two dimensional impressions on paper, fabric or skin. Carving them into wood presented some problems with proportions and spacing because of the depth dimension and sloped edges. Also, in the two dimensional representations, there is almost always an important contrast of positive and negative spaces…usually dark printing on a light background. Showing this contrast in uniformly colored wood required some added steps. I wound up using dark background stains and pyrography.

Despite these challenges, I was able to find a few crest designs that seemed to lend themselves to carving on the top of a wooden box. Three are shown in the photo above. Have you ever used Japanese crests in your work?