Saturday, August 27, 2011

Wooden Spoons: a novel by Dennis Ruane


My daughter pointed out a novel that she thought I might be interested in. It’s called “Wooden Spoons” by Dennis Ruane. It is promoted as a novel about life, death, love and art. The title and description intrigued me so I bought the novel and read it. It was easy reading and a good summer vacation novel; more like a made-for-TV movie than a great work of fiction, but enjoyable none the less.


It is about a professor who abandons his position at the university, leaves his wife and isolates himself on his old family homestead on a mountain top in southwestern Pennsylvania. He lives in the old ways and begins carving wooden spoons. Don’t expect a lot of details on the wood carving itself. That area is presented in a pretty general manner. The novel touches on themes like: finding out what you were meant to do in life, and then having the courage to do it; preserving historical sites; making utilitarian things from wood with hand tools in the traditional manner; and focusing on what is important in life. All good stuff.  There is a plot conflict with a treacherous land developer that makes things interesting, and a nice ending.


“Wooden Spoons” is a semi-autobiographical novel. The author Dennis Ruane grew up in southwestern Pennsylvania like the character in the book. Also, like the character, Dennis abandoned a career in science to become a full time wood carver. More than just a carver, Dennis is a creative wood artist. Visit his website at: http://www.dennisruane.com/, to will see examples of his work.

You can buy a used (like new) paperback on Amazon for about $10. Enjoy.

Monday, July 11, 2011

Carved Carousel Horses at Knoebel's

I’ve heard about Knoebel’s Amusement Resort for many years, but never had the opportunity to visit until the family went there to celebrate my Aunt Millie’s 80th Birthday last month.  Knoebel’s is a very unique and wonderful place.  It is an old fashioned amusement park with no admission charge and free parking!

The Grand Carousel

The prices for the rides are so low, at first I thought I was reading them wrong. The kiddie rides cost 75 cents and the big wooden roller coaster costs only $2.25.  Knoebel’s is not located on some busy interstate, but rather in a quiet valley on the back roads of rural central Pennsylvania.   It’s been family owned and going strong for over 85 years.  It’s probably the cleanest and best maintained amusement park that I have ever been in.

The Stein & Goldstein Carousel
There are hundreds of free picnic tables available for use, in various roofed pavilions, in “the grove”. We reserved four for the party. No charge. You may have never heard of Knoebel’s but you can bet the people of central Pennsylvania have. They keep it a secret for themselves, even though Knoebel’s has won international awards.

But Knoebel’s is more than just an amusement park. It is a “must visit” sight if you are interested in carved carousel horses. They have not one, but two carousels with carved horses, and an excellent carved carousel animal museum.

The Grand Carousel was built in 1913 by George Kremer, who bought the carved wooden horses from wood carver Charles Carmel.  It is a four-abreast machine that used to be at Riverside park in Rahway, NJ.  The Kiddieland Carousel was built around the same time by Stein and Goldstein in Brooklyn, NY.  Both carousels have beautiful examples of carefully restored carved horses from that period. You almost think they should be preserved somewhere instead of being exposed to daily wear and tear.  But then, that’s what they were carved for in the first place.
The Carousel museum is small but it contains a complete history of carved carousel horses and shows how they developed from crude figures to the elaborate styles of the early 1900’s, the Golden Age of Carousels.  They also have a fine collection of carved carousel animals other than horses.
It’s interesting to think that a century ago, when these beauties were carved, the carvers who created them were probably considered as little more than laborers, yet their artistic skills and craftsmanship would make them well respected artisans today.   Visit Knoebel’s and appreciate their work.

Monday, May 9, 2011

Musical Wood in the Woods

You know I like clever things made out of wood. You know I like forests. You know I like music.  Well, this video obviously rates very high on my "like" list.  It's totally amazing.  Enjoy.


You can see the full width version at:  http://www.flixxy.com/musical-wood.htm 

Tuesday, April 26, 2011

Spirit in the Wood

“…The tree, which is used for the body of the drum, contains a living spirit. Great care is taken to make sure that the wood of the drum is alive.” 
from: “The Beat of My Drum: An Autobiography” by Babatunde Olatunji

Ask my family. Most of my adult life I have wanted a hand drum. That might seen to be an unusual desire coming from a retired white guy in the suburbs, but it was an itch that just wouldn’t go away. At first I thought I wanted a conga drum. Then I attended a drum circle where they had an assortment of African drums to use for the evening. Most of the drums were djembes, the familiar West African style drum, but a few were different. They were taller, had a slightly different shape and a much deeper, richer sound. They are called bougarabou, a bit of onomatopoeia, since the drum name is the sound it makes (bou-gara-bou). I immediately knew what type of drum I wanted. It was a perfect fit for my baritone soul.


Last week I finally got my drum. I love it. I bought it from a shop called “Spirit in the Wood”. With a name like that, how could I do otherwise? Spirit in the Wood is a small, one-man operation. That man is Conrad Kubiak, a professional drummer, drum teacher and drum maker. Conrad is an interesting character. He may be a reincarnation of Leonardo DaVinci. He works out of a small house with detached garage/workshop, on a small road in rural Bucks County, PA. There is no sign and most people would just pass it by. Most people, yes, but any person who works with wood would notice the collection of hefty log sections sitting in his driveway, especially since half of them have large, interesting-looking burls on them, waiting to be turned into works of art.


There is no doubt that Conrad is a wood craftsman. Just like all other wood turners, Conrad has a lathe. The only difference is that while some turners make pens, Conrad makes conga drums. He turns his own drum shells on a monster industrial lathe that must be 100 years old, and takes up half of his workshop. He has personally developed special tooling and techniques that sets his craft apart.

Sure he makes high quality drums out of fine hardwoods, but if you look closely on the dusty shelves you will also fine beautiful bowls turned out of burl and fine crafted wooden boxes that will be magnificent, if he ever gets to finish them. Conrad knows drums, and he also knows wood.


My bougarabou drum


I bought my drum from Conrad, but not one of his hand-crafted works of art. Since this is my "beginner’s” drum, I bought one that was hand carved out of iroko wood by a craftsman in the Ivory Coast, a genuine West African drum. But who knows? If I get good, maybe I’ll upgrade to one of his eye-popping cherry wood originals.

Saturday, April 9, 2011

The Look, Touch and Smell of Wood

I remember visiting Duckloe Furniture in Portland, PA several months ago. They have exquisite examples of American hand-crafted furniture. Their showroom is filled with everything from Arts and Crafts and Shaker styles to Windsor Chairs that they have been making themselves for over 150 years. The woods and grain patterns are awesome. Words like bird’s eye, tiger, quarter-sawn and burl are used a lot in the wood descriptions of the items on display.

Like a naughty child, I found myself touching everything. As I ran my hand across the top of a table or over the carved decorations I realized how much I love to touch wood. There is a tactile sensation that brings me joy. The smoothness of the finish, the beauty of the grain pattern, even the smell of the beeswax and oil, all contribute to my sensual enjoyment.


I get a similar feeling in my own workshop. It may be the fine sawdust that remains in the pores of your hand after sanding; or feeling the contour of a piece you just carved. I’m sure many of you fellow woodworkers know what I mean. I remember finishing a spoon with wax and mineral oil and then sitting watching TV and just rubbing the finish with my bare hands for quite some time. It was a comforting sensation. You may argue that velvet or leather also gives tactile pleasure, but when it comes to hard materials, nothing beats wood.


I just completed my Salamander Cane. It was my first attempt in carving a critter wrapped around the cane. Instead of carving a detailed snake with hundreds of tiny scales like the award-winning artist, Dave Stehly, I chose a much simpler piece for my first attempt. The salamander is a lot smaller and its skin is smooth and easy to carve. I liked the feel of the wooden cane handle. I realized why canes and walking sticks are made of wood. For some reason, it just seems natural.


Has working with wood heightened your sensual awareness?


Friday, February 18, 2011

Making the Canary Wood Box

As promised, here are instructions, photos and tips that follow my work on the Molten Wood band saw box made from a chunk of canary wood.

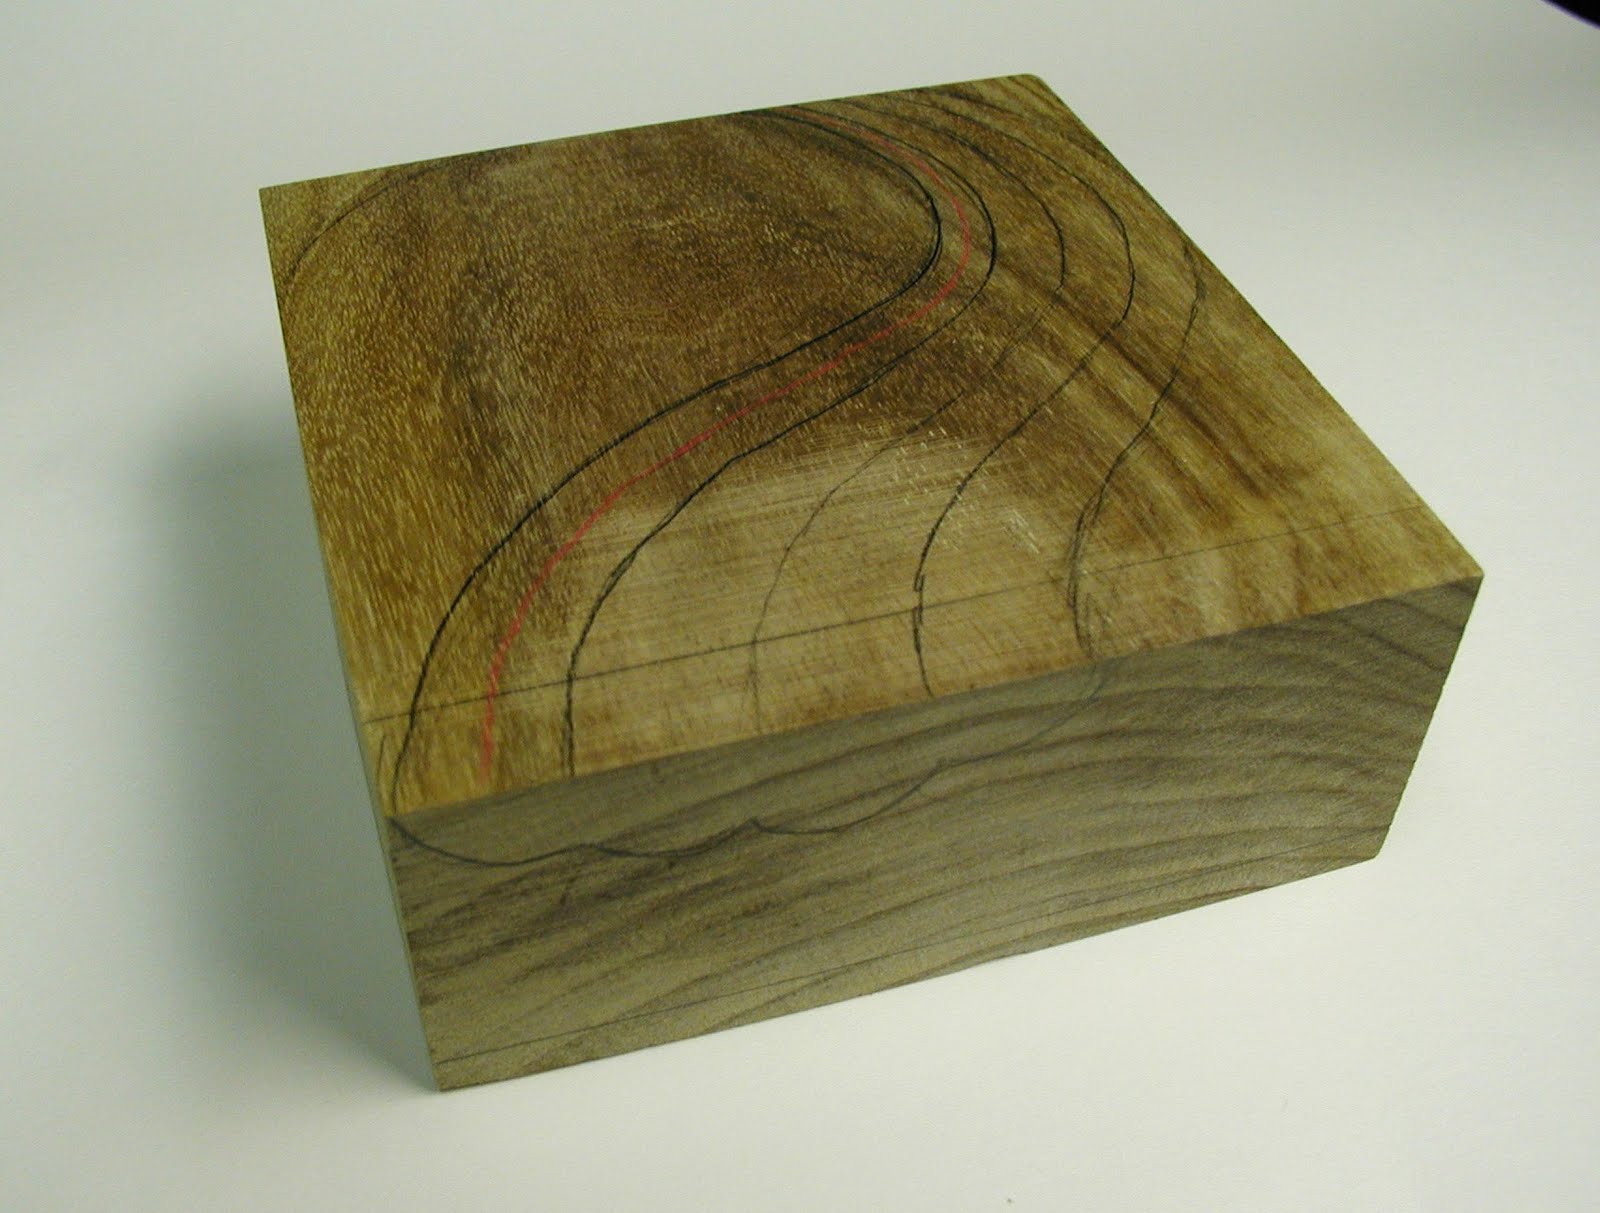
I purchased this slab of canary wood about 6 years ago from a bargain table at Woodcraft. I've been waiting for the right project. The first step is to draw the design on the wood.


I used power carving tools to get the deep wave grooves. A round bur works best. Start coarse and work to fine.


Rough shape of the wave grooves completed. It's time to go to the band saw.


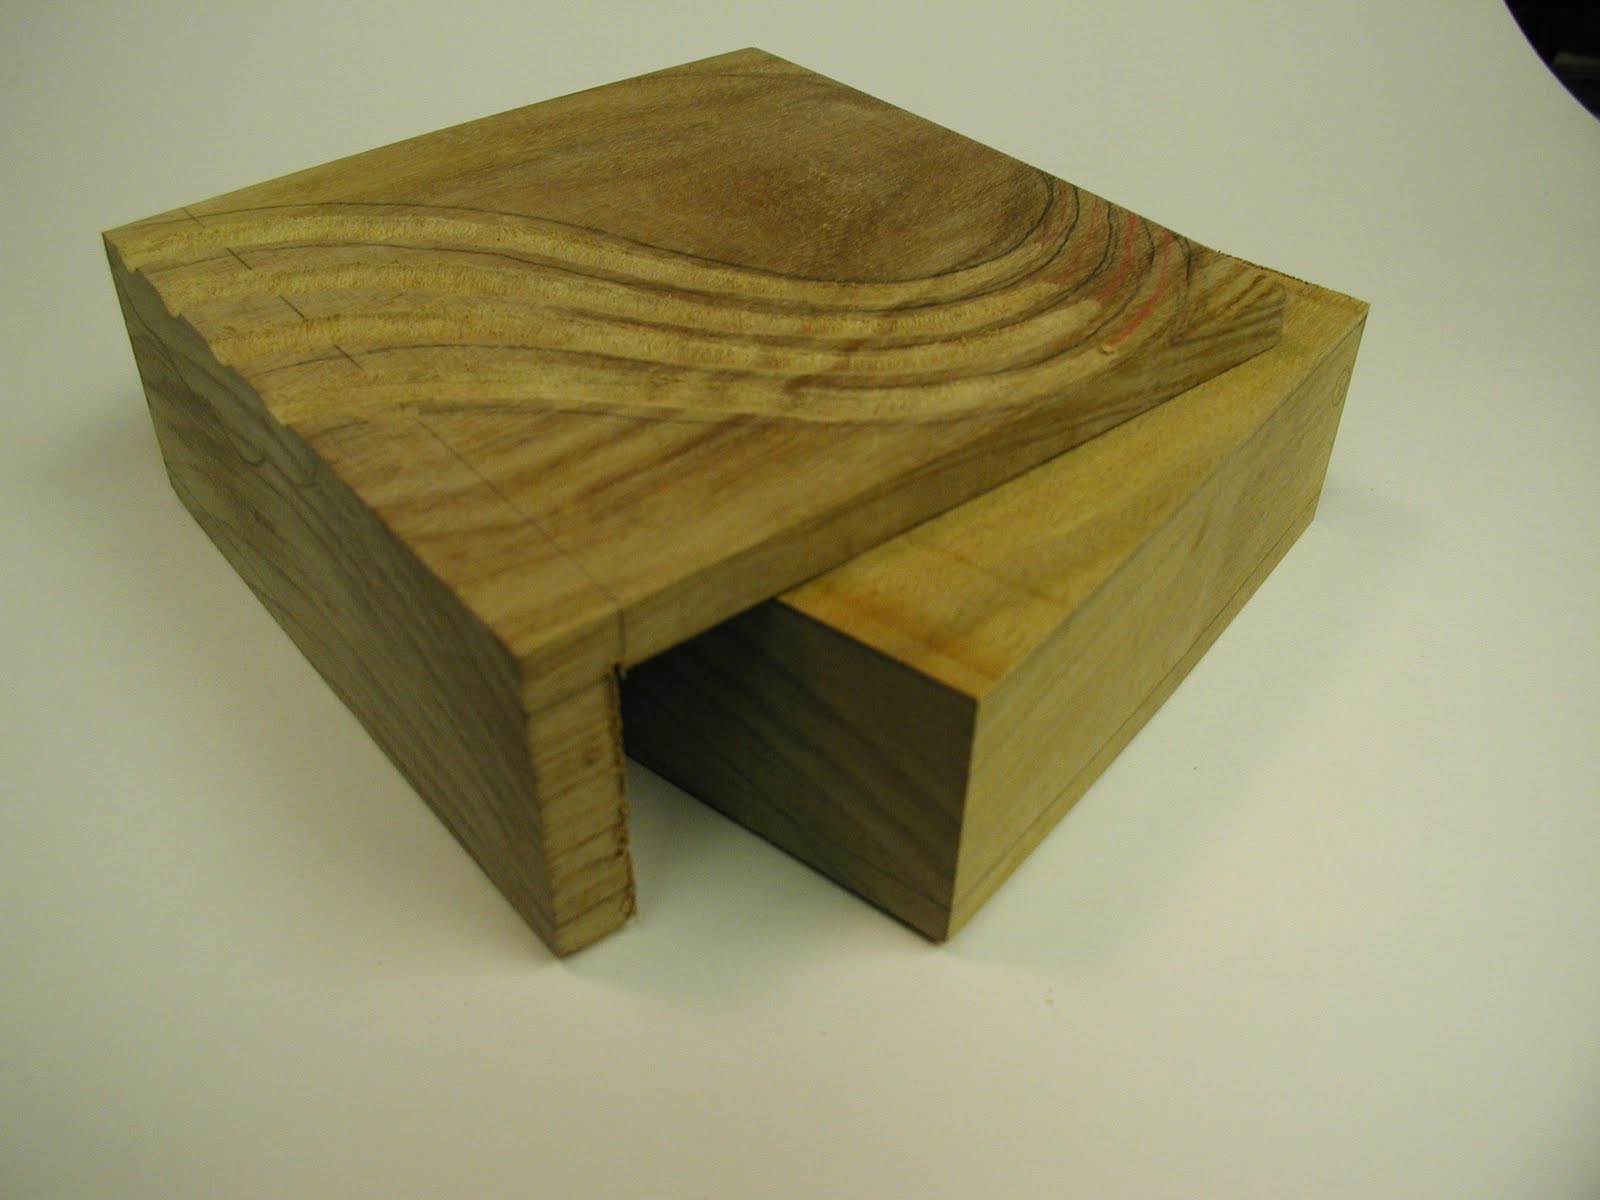
Here's where it gets a little tricky. Instead of just sawing off the top of the box like you would in making a normal band saw box, you saw up to a marked point and then saw at 90 degrees to that line to create the overhang.


Next, use the band saw to cut out the overhang shape. This is hard to explain, but it is probably obvious to any woodworker.


Here's the way the overhang looks after sawing. As you can see, I cut a little too far into the first wave. This will have to be fixed up later.


Now, cut off the bottom as you would normally do when making a band saw box.


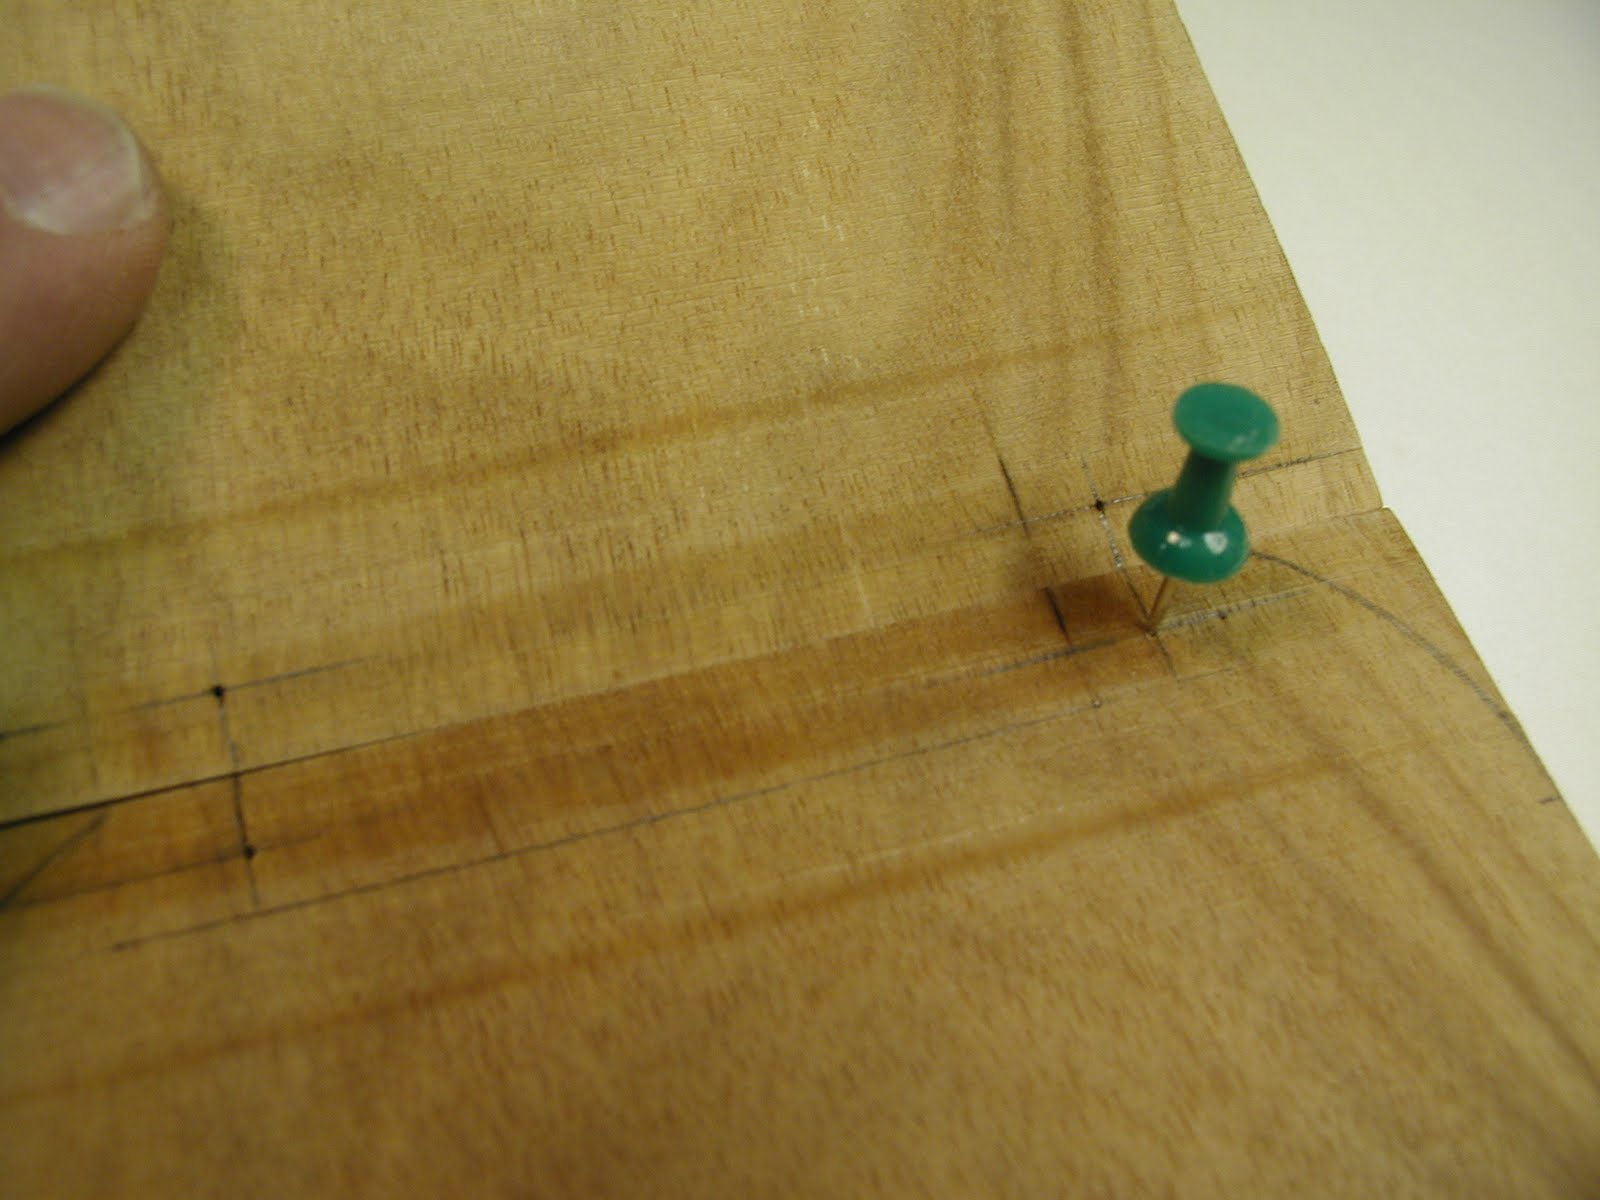
The trickiest part of making this box is getting the barrel hinges to align perfectly. If they are off by even one millimeter, the box will never open and close properly. Accuracy is essential. Wood crafters have many tricks for getting proper alignment. You can find them on the internet. As for me, I have found that careful measurent and a brad tipped drill bit can get you right on the money. I start by exact measurement lines and precise marking with a push pin to set the exact hole center.


The barrel hinges are cylinders 5 mm in diameter with a hinge pin in the middle. I bought a 5 mm brad point drill bit and I am very pleased with the results.


I clamped the wood loosely on the drill press and then carefully guided the brad tip of the drill bit into the hole made by the push pin. I then clamped it securely and drilled the hole. Since the box top is thin, be careful with the depth of the hole. The objective is to position the tiny center pin shaft of the hinge exactly at the surface of the wood on both the top and the end of the box.


The next step is to make a 45 degree cut in the lid and the base. The angle must intersect the exact middle point of the hinge at the pin so the lid will open correctly. Needless to say, this can be very tricky. Again, precise measurement is very important. Of course experience and a little luck doesn't hurt either. I used my table saw which is set up with a very accurate 45 degree crosscut sled. In the past I have also used my router table. My wood craftsmanship is far from perfect, so I wound up doing some "corrections" work on the belt sande to get everything to work properly. No glue yet. This is just a dry fit at this point to make sure all the parts work.


Up until this point I have been working with a squared off block of wood. It is important to have this "right angle" frame of reference for proper alignment and measurements. Now it's time to add some curves. I cut the outer shape of the box on the band saw.


Here's what the box looks like at this point. Remember, the inside is still solid wood.


Take off the top and bottom and use the band saw again to cut the box interior out of the middle section. I entered near the corner so it would be easier to glue and hide the entry point. The dark lines on the curved corners indicate that I need to change my saw blade. A rubber backed sanding cylinder on my rotary tool will get these marks out without much effort.


Gluing. I use Tightbond II. First glue the center section of the box together at the saw blade entry point. An elastic band clamp works fine for this. Make sure the alignment is exact.


The next step is to glue the bottom to the box side section. Use good clamps for this. Once clamped, I usually lightly sand the outer surface at the glued joint. The fine saw dust will stick to the glue and fill up any voids in the intersection.


Now comes the sanding, and lots of it. Notice how the box lid slightly overhands the side of the box. This is caused by gluing together the kerf void on the perimeter section. One side is now a bit shorter. To the belt sander! At this point I am also still forming the waves on top of the box with power carving burs and rotary sanding tools. Hand gouges were also used. Anything that works and is within reach. I mark areas that need wood taken away with a red pencil. I do this regularly during the forming process. Shape. Stop and take a look. Mark. Shape some more. A lot of patience and a lot of sawdust.


Next, I gave the whole box a light coat of wipe-on polyurethane varnish. In this photo of the back of the box, notice how the 45 degree cut is precisely at the center of the barrel hinge hole. I use epoxy to secure the barrel hinges and open and close the box severall times during the 5 minutes it takes the epoxy to set to make sure the cover sets and opens correctly. After fine sanding, I put a few coats of satin poly varnish on the box as a finish coat.


As any artisan will tell you, you have to know when to stop improving what you have and call the piece "finished". I had a perfect reminder of this on this box. I kept on sanding away on the wave grooves until I sanded right through the wood. Yikes! After hours and hours of work, I now had a hole right in the key focus spot of the piece. A tiny hole, but to me it seemed like you could drive a truck through it. Of course I panicked and thought it was the end of the world. But a little wood filler and some very precise staining and you can hardly notice the flaw. Look at the second groove from the left.


So that's how I made the box. I probably could have included another 8 or 9 photos, but it is very lengthy as it is. I hope these instructions and personal tips will be of help to you. Let me know if they were.

Saturday, February 12, 2011

Molten Wood


Ask any kid. Sculpting with clay is fun. Playing with Silly Putty is even more fun. If you let it sit on an edge, it would ooze and flow over time. Sculpting with wood is a lot harder. You can’t just push the wood around like clay to change the shape. You can’t just let it ooze over the edge. But maybe you can make the wood look like you just formed it like clay. Maybe you could make the wood look like it was melting. This is what I have tried to accomplish in my latest experiment with hinged-lid band saw boxes.

The light rectangular box is made out of spalted maple from my yard. The darker, squarer shaped box is made of canary wood. Each is cut from a solid piece of wood using band saw box techniques. Each uses small barrel hinges for the lid, so it remains attached.


I took pictures during the entire process of making the canary wood box. I will show them with step-by-step instructions in my next post for anyone who is interested.